Page 1 of 2
M201 - GTM32 Suggestions & Questions
Posted: Mon Jul 04, 2016 12:31 am
by greeffbf
I Bought a M201 - with the GTM32 controller via Banggood.
I bought this machine due to few reasons.
1 - GTM32 Controller can handle 3 extruders (No firmware to be found)
2 - Larger Print are 280 x 220
MODS
I replaced the lead screws with 8 x 2mm 4 groove and replaced the Z steppers with 0.9Deg 48mm Nema
I got rid of the flexible couplings on z axis drive to cut out slop. Your configuration make 2 heads not very accurate)
I modified the 2 in 1 head with 2 in 2 head.
I removed the fan on extruders at top. Useless.
I grinded down rod locks to provide maximum travel.
I modified Z axis end stop with lock nut to make more accurate.
I made PTFE tubes as short as possible to get more accuracy when withdrawing filament printing on 2 extruders.
Questions
1 - I use the GTM32-Dual extruder software and every now and then the LCD goes blank. Is this normal?
2 - Sometimes the print just freezes up at various fases of same job (Printing from SD card.) Sometimes prints fine, then freeze at 40 %, then at 67% never the same.
3 - It seems as heating bed element a bit weak to heat up aluminium bed fast. Can you not get higher wattage bed in same size?
4 - Can you please supply firmware so it can do 3 x extruders?
Suggestion
You have great idea but having firmware not accessible makes printer undesirable.
Re: M201 - GTM32 Suggestions & Questions
Posted: Mon Jul 04, 2016 4:42 pm
by syossi2
i with you.....i also put 3rd nozzle
i have 2 in1 and one saparte side by side
but .....
i also ask them to this 2 mounth ago....
that the firmware will recognize this 3 ports thermistor T2 , nozzle 2, extruder 2
and the 3 max end point to make them works and reconize by the firmware
hope they will do it soon
yossi
Re: M201 - GTM32 Suggestions & Questions
Posted: Mon Jul 04, 2016 4:47 pm
by William
greeffbf wrote:I Bought a M201 - with the GTM32 controller via Banggood.
I bought this machine due to few reasons.
1 - GTM32 Controller can handle 3 extruders (No firmware to be found)
2 - Larger Print are 280 x 220
MODS
I replaced the lead screws with 8 x 2mm 4 groove and replaced the Z steppers with 0.9Deg 48mm Nema
I got rid of the flexible couplings on z axis drive to cut out slop. Your configuration make 2 heads not very accurate)
I modified the 2 in 1 head with 2 in 2 head.
I removed the fan on extruders at top. Useless.
I grinded down rod locks to provide maximum travel.
I modified Z axis end stop with lock nut to make more accurate.
I made PTFE tubes as short as possible to get more accuracy when withdrawing filament printing on 2 extruders.
Questions
1 - I use the GTM32-Dual extruder software and every now and then the LCD goes blank. Is this normal?
2 - Sometimes the print just freezes up at various fases of same job (Printing from SD card.) Sometimes prints fine, then freeze at 40 %, then at 67% never the same.
3 - It seems as heating bed element a bit weak to heat up aluminium bed fast. Can you not get higher wattage bed in same size?
4 - Can you please supply firmware so it can do 3 x extruders?
Suggestion
You have great idea but having firmware not accessible makes printer undesirable.
Hi,my friend
Thank you for your suggestions,we are happy to hear that.
1.I think you can have a try to reset it on controller panel.
2&3.It is about the software and hardware,i'll feed it back to our engineer.
4.I'm afraid that we have no plan to update firmware temporarily for 3 extruder on M201.
Regards
Re: M201 - GTM32 Suggestions & Questions
Posted: Mon Jul 04, 2016 4:56 pm
by syossi2
its too bad,,,

its so easy just to enabled on firmware the
3 ports thermistor T2 , nozzle 2, extruder 2
pleaseeeeeeeeeeeeeeeeeeeeeeeeeeeee
Re: M201 - GTM32 Suggestions & Questions
Posted: Mon Jul 04, 2016 5:43 pm
by syossi2
hi greeffbf
can you explane with picture please the selected mods you have done please?
"
I replaced the lead screws with 8 x 2mm 4 groove and replaced the Z steppers with 0.9Deg 48mm Nema
picture please
I got rid of the flexible couplings on z axis drive to cut out slop. Your configuration make 2 heads not very accurate)
picture please
I modified the 2 in 1 head with 2 in 2 head.
picture please
I grinded down rod locks to provide maximum travel.
picture please
I modified Z axis end stop with lock nut to make more accurate.
?? i try to put also end stop . but the firmwre didnt activat it... so how did you do it?
"
thanks
yossi
Re: M201 - GTM32 Suggestions & Questions
Posted: Tue Jul 05, 2016 1:28 am
by greeffbf
Pictures as requested
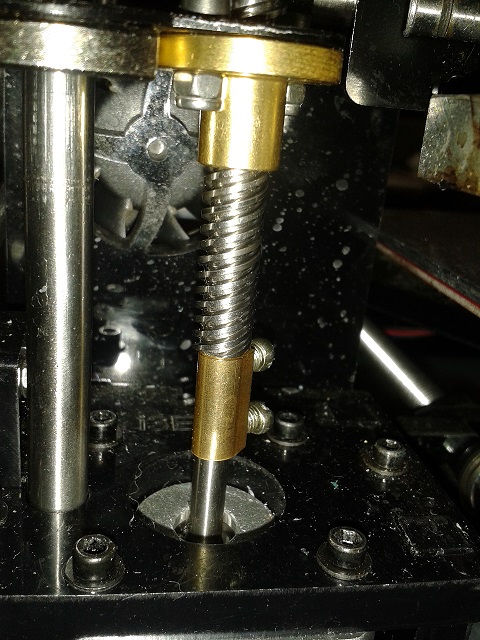
- Lead screw and 5mm to 5mm coupling, I turned the lead screw ends down to 5mm
- Lead screw Coupling.jpg (156.27 KiB) Viewed 15167 times
Lead screw and 5mm to 5mm coupling, I turned the lead screw ends down to 5mm
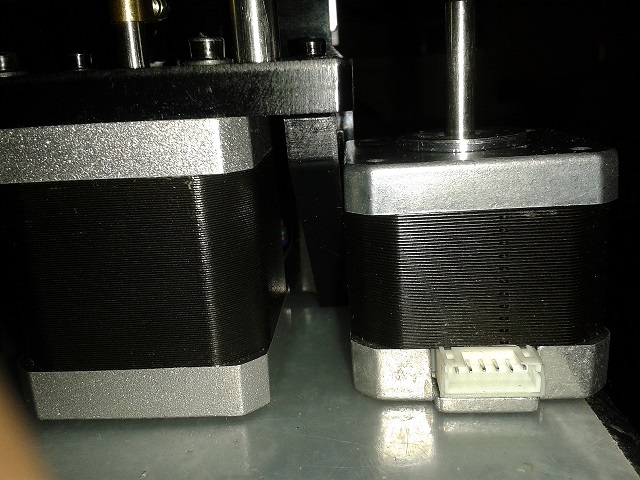
- Nema Stepper 0.9deg
- Stepper Nema09_48.jpg (126.8 KiB) Viewed 15167 times
Nema Stepper 0.9deg
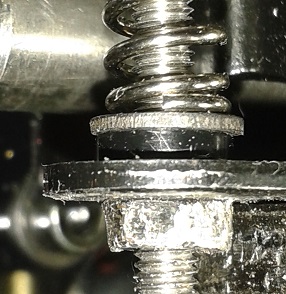
- Locknut on Z stop min
- Locknut on Z-min Stop.jpg (66.52 KiB) Viewed 15167 times
Locknut on Z stop min
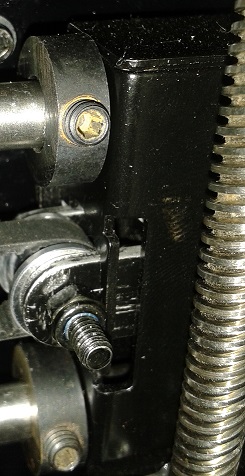
- Grinded Bar Locks
- resized bar locks.jpg (76.38 KiB) Viewed 15167 times
Grinded Bar Locks
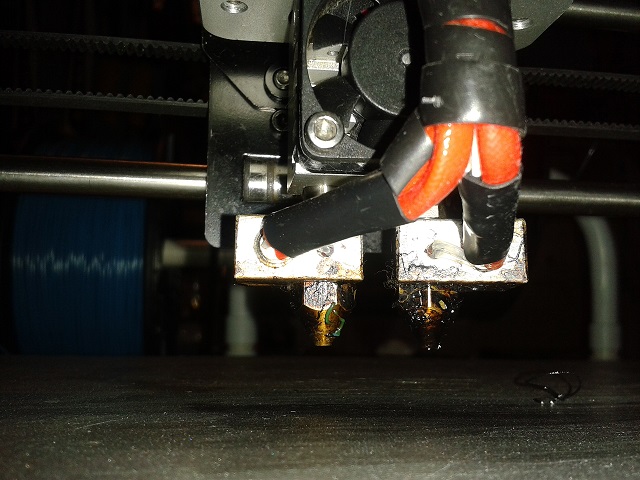
- Dual Print Head
- Dual Printhead.jpg (113.73 KiB) Viewed 15167 times
Dual Print Head
Re: M201 - GTM32 Suggestions & Questions
Posted: Tue Jul 05, 2016 8:46 am
by syossi2
Thanks
So you install the dual head firmware? The old one that here on the website?
Yossi
Re: M201 - GTM32 Suggestions & Questions
Posted: Tue Jul 05, 2016 1:33 pm
by greeffbf
Yes, it is called GTM32_Dual.zip and was posted by Mark.
To add z-axis max end stop.
Control ->
Printer Settings ->
Move right down to end stops, select z-max end stop. try the settings. Remember end stop will only work if axis max is greater than end stop position.
Re: M201 - GTM32 Suggestions & Questions
Posted: Tue Jul 05, 2016 1:59 pm
by syossi2
so you buy the mk8 dual head?
Re: M201 - GTM32 Suggestions & Questions
Posted: Tue Jul 05, 2016 2:35 pm
by greeffbf
No, I bought Two hot ends (the smallest I could get), Two nozzles, Two thermisters and Two 24Volt heaters in order to swap back when I want.
Just remove the last aluminum block 2 into 1. And assemble this. Easy to revert back to 2 in 1 out.
The biggest secret is setting the two heads very accurate same distance from print bed(Main reason why I replaced flexible couplings and lead screws).
Then in Slic3er you specify the offset of the two heads, there is a nice STL file with 4 checker squares you can use to fine tune and play with retract of fillament etc.. Can't remember the name now.
Cheers
Francois